Make Cooking Great Again
Ezekiel Bread Recipe: How To Make It In 7 Simple Steps
Prep time
30 minutes
Cooking time
45 minutes
Calories
180 kcal
Have you ever wondered about that hearty, nutrient packed bread called Ezekiel bread found in the freezer aisle? What if you could bake the real deal fresh, fragrant, and far more delicious right in your own kitchen? Good news: this authentic ezekiel bread recipe makes it totally possible, and surprisingly simple! Forget complicated methods; we’re breaking it down into just 7 clear steps. Discover why homemade sprouted grain bread isn’t just tastier, but also a rewarding journey into baking something truly wholesome and special. Let’s unlock the secrets of this biblical bread together!
Why Try This Ezekiel Bread Recipe?
This isn’t just another bread recipe it’s a powerhouse of nutrition! The magic of this ezekiel bread recipe lies in the sprouted grains and legumes. Sprouting wakes up the seeds, boosting vitamins, minerals, and making nutrients easier for your body to absorb. Think of it as nature’s superfood loaf! Plus, it has fascinating roots, inspired by a passage in the Bible .
Beyond health, baking it yourself is a win win. Store bought Ezekiel bread can be pricey and sometimes lacks that fresh from the oven magic. This homemade version lets you control the ingredients, ensuring absolute freshness and saving you money. The process might sound fancy, but this ezekiel bread recipe truly simplifies it. You’ll be amazed at how achievable that perfect, dense yet moist sprouted loaf really is!
What You’ll Need: Ingredients & Equipment
Gathering your supplies is the first easy step! Here’s exactly what you need for this nourishing ezekiel bread recipe.
Essential Ingredients for Ezekiel Bread
Essential Ingredients
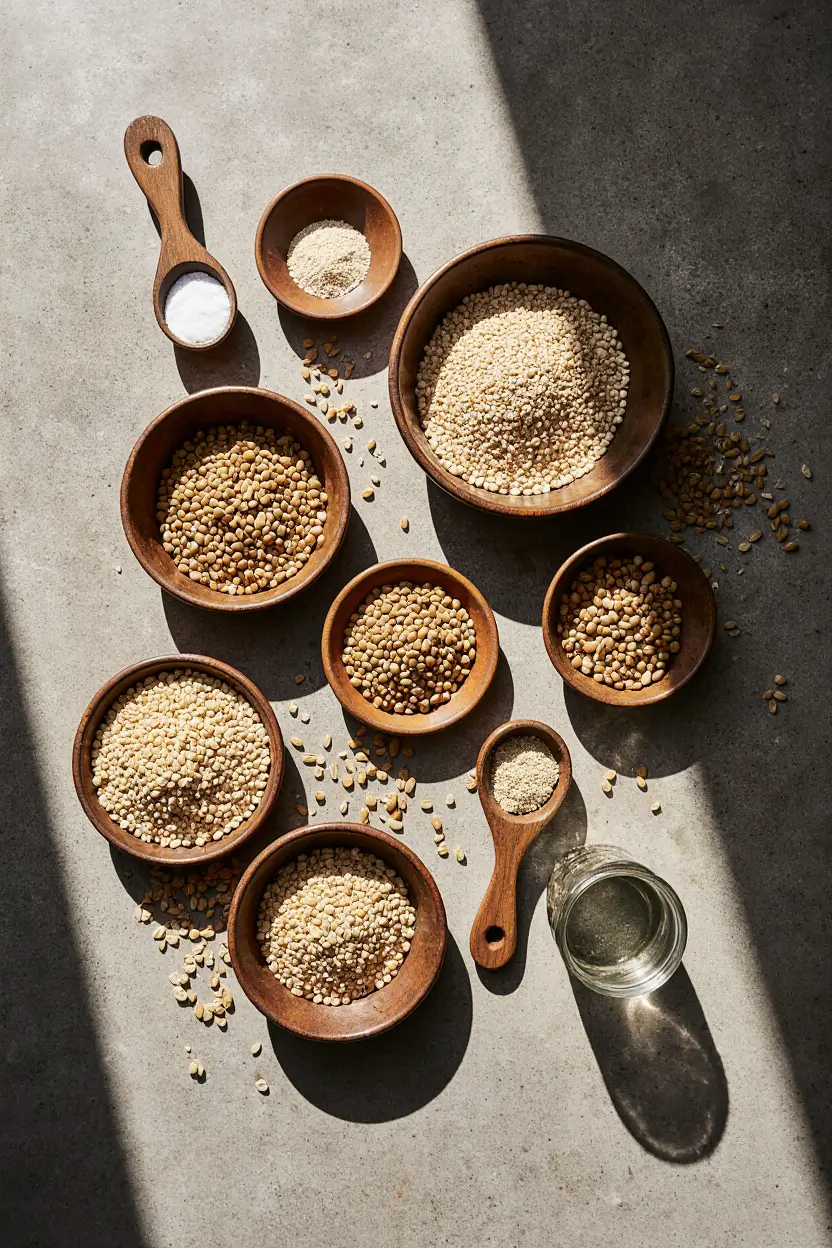
1 cup berries (or barley)
1 cup Hard wheat berries
1 cup Green lentils
1 cup Great Northern beans
1 cup Millet
1 cup barley
2 tbsp vital wheat gluten (optional)
1½ tsp sea salt
½ cup warm water (110°F/43°C)
1 tbsp honey or molasses (optional)
Simple Kitchen Tools
No fancy equipment required! You likely have most of these:
- Food Processor or Meat Grinder (Essential for grinding the sprouts)
- Large Mixing Bowl
- Wooden Spoon or Dough Whisk
- Measuring Cups and Spoons
- Standard 9×5 inch Loaf Pan
- Parchment Paper (Makes removal super easy)
- Clean Kitchen Towel (For covering the dough)
- Oven Thermometer (Recommended for accuracy)
- Instant-Read Thermometer (Best way to check if bread is done)
Your Step-by-Step Ezekiel Bread Recipe Guide
Ready for the fun part? Let’s bake! Follow these 7 simple steps for your perfect homemade ezekiel bread recipe.
Step 1: Preparing Your Sprouted Grains & Legumes
- Drain Thoroughly: Your sprouted grains and beans should be drained well. Give them a final rinse in a colander under cool water.
- Pat Dry (Gently!): Spread them out on a clean kitchen towel or paper towels. Gently pat them mostly dry. They don’t need to be bone dry, but excess water will make the dough too sticky. A little moisture is okay!
Step 2: Grinding the Sprouts into Fresh Flour
- Grind in Batches: Working in batches, add the drained sprouts to your food processor (using the “S” blade) or meat grinder.
- Pulse to Flour: Pulse or grind until the sprouts form a coarse, sticky meal or paste. It won’t look like regular dry flour that’s perfect! It should hold together when squeezed. Don’t over process into a smooth puree; a little texture is good.
- Transfer: Scrape all the ground sprout mixture into your large mixing bowl.
Step 3: Mixing the Ezekiel Bread Dough
- Add Dry Ingredients: Sprinkle the vital wheat gluten (if using) and salt over the ground sprouts in the bowl.
- Add Sweetener (Optional): Stir in the honey or molasses, if using.
- Add Warm Water: Start by adding about 1/4 cup of the warm water.
- Mix & Knead Briefly: Use your wooden spoon or dough whisk to mix everything together. Then, use your hands (lightly oiled if very sticky) to knead the dough right in the bowl for just 2-3 minutes. The goal is to combine everything evenly, not develop tons of gluten like regular bread. The dough should be tacky and hold together, but not be overly wet. Add the remaining water 1 tablespoon at a time only if the dough feels too dry and won’t come together.
Step 4: First Rise (Bulk Fermentation)
- Cover & Rest: Shape the dough into a rough ball in the bowl. Cover the bowl tightly with plastic wrap or a damp kitchen towel.
- Find a Warm Spot: Place the bowl in a warm, draft-free spot in your kitchen (like an oven with just the light on, or near a radiator).
- Let it Rise: Let the dough rise for about 1 to 1.5 hours. It won’t double like regular dough, but you should see it puff up noticeably, maybe increasing by 50%.
Step 5: Shaping the Loaf
- Prepare Pan: Line your 9×5 inch loaf pan with parchment paper, letting it hang over the sides for easy lifting later.
- Gently Shape: Turn the risen dough out onto a very lightly floured surface (use regular flour or a bit of vital wheat gluten). Handle it gently to avoid squashing out all the air.
- Form the Loaf: Pat or gently roll the dough into a rectangle roughly the length of your pan. Tightly roll it up from the short end, pinching the seam closed. Tuck the ends under slightly.
- Place in Pan: Place the shaped loaf seam side down into the prepared loaf pan. Press it down gently to fit.
Step 6: Second Rise (Proofing)
- Cover Again: Loosely cover the loaf pan with plastic wrap or a damp towel.
- Warm Proof: Return it to that warm spot for the second rise. This usually takes 45 minutes to 1 hour.
- Check Readiness: The dough should rise just above the rim of the pan. Do the “finger poke test”: Gently poke the side of the dough. If the indentation springs back slowly but stays slightly indented, it’s ready! If it springs back quickly, give it more time. If it collapses, it’s over-proofed (bake immediately).
Step 7: Baking Your Ezekiel Bread to Perfection
- Preheat Oven: About 20 minutes before baking, preheat your oven to 350°F (175°C). Place an oven rack in the middle position.
- Score (Optional): Right before baking, you can make a shallow slash (about 1/4 inch deep) down the center length of the loaf with a very sharp knife or razor blade. This helps control expansion.
- Bake: Place the loaf pan in the preheated oven.
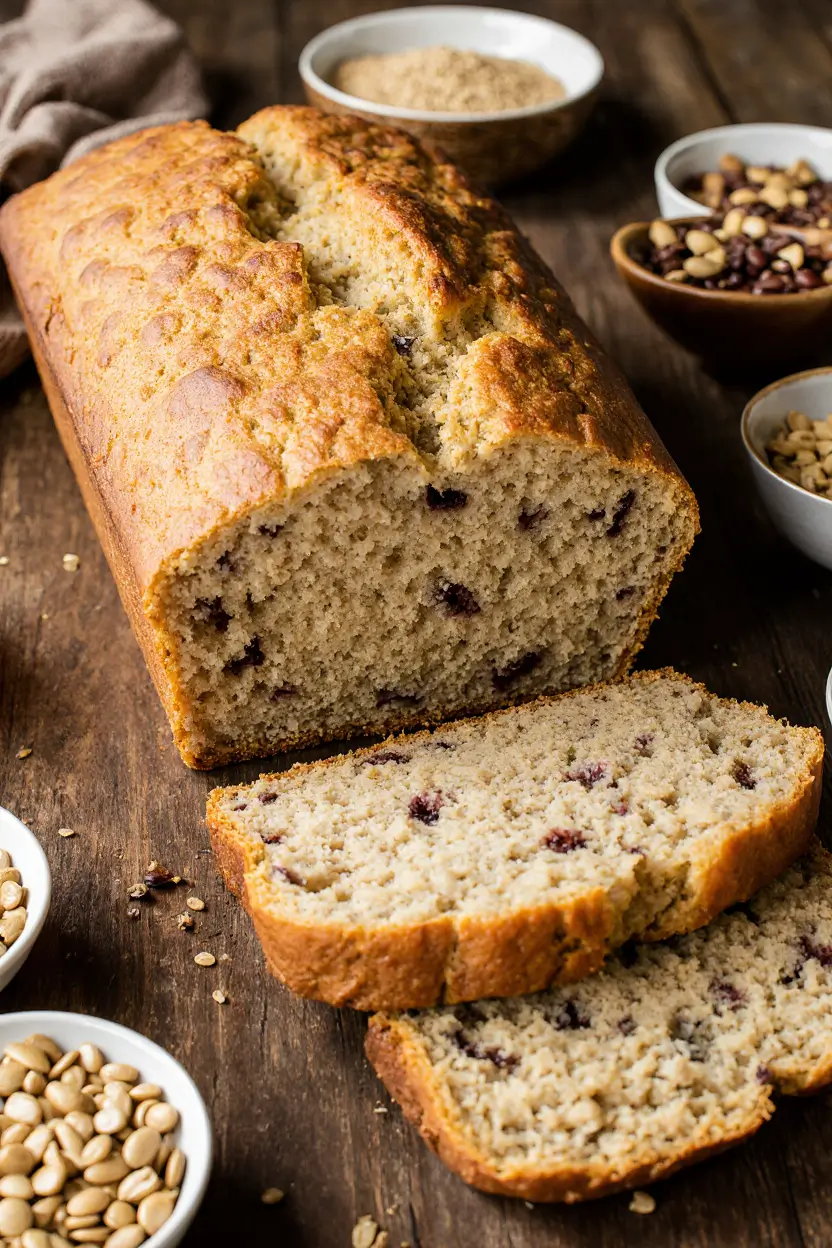
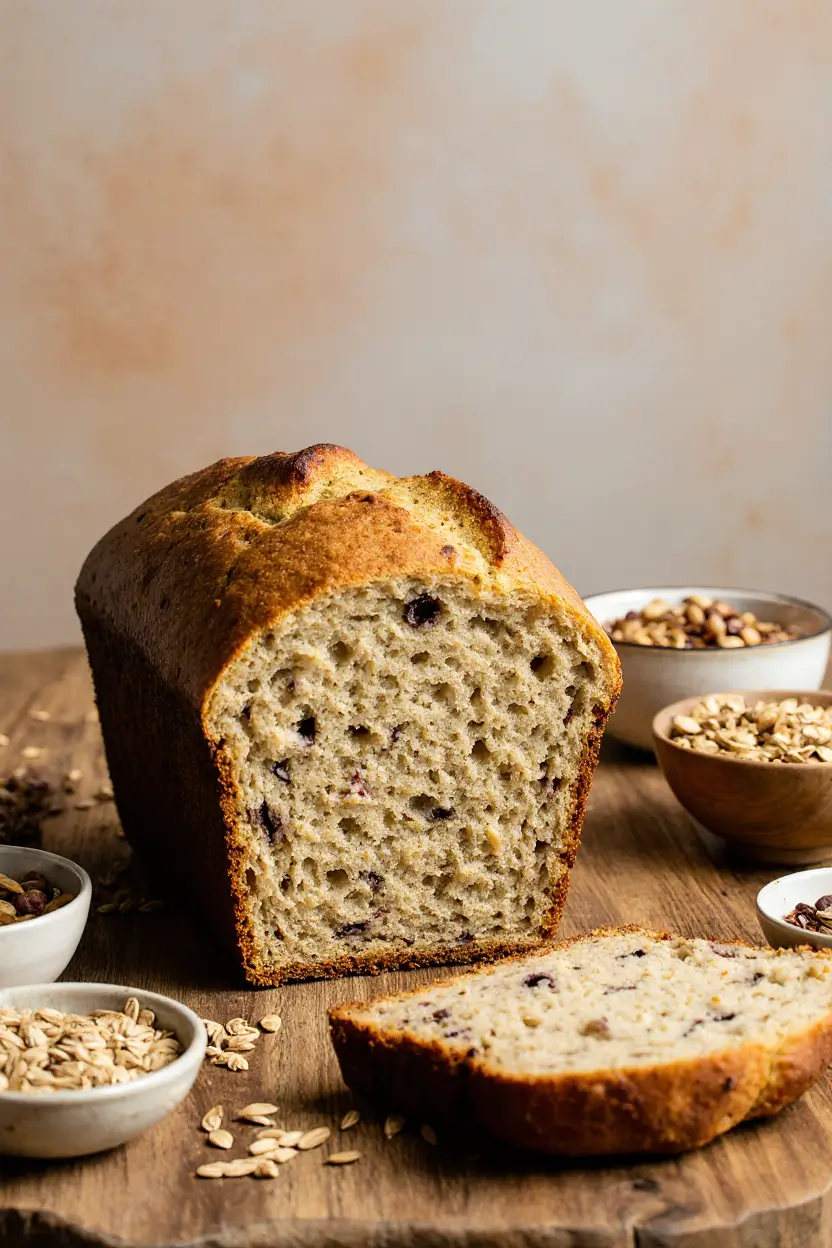
- Bake Time: Bake for 45-55 minutes. The bread is done when:
- It’s deep golden brown all over.
- It sounds hollow when you tap the bottom (carefully lift it out using the parchment).
- Best Test: An instant-read thermometer inserted into the center reads 200-210°F (93-99°C).
- Cool: This is crucial! Immediately remove the bread from the pan using the parchment paper handles. Place the loaf directly on a wire rack. Let it cool completely (at least 2 hours, preferably more) before slicing. Cutting too soon makes it gummy!
Essential Tips for Ezekiel Bread Success
Making this ezekiel bread recipe is straightforward, but these pro tips guarantee a fantastic loaf every time.
Mastering the Sprouting Process (Key to Flavor!)
- Rinse, Rinse, Rinse! Rinse your sprouts thoroughly 2-3 times a day with cool water. This prevents mold and keeps them fresh.
- Drain Well: After rinsing, shake the colander well and let them drain completely. Sitting in water = bad news.
- Ideal Length: Look for small tails about 1/4-inch long. Longer sprouts can be harder to grind and make the dough too wet.
- Troubleshooting: If they smell sour or funky, toss them and start over. Ensure good air circulation during sprouting (a jar tilted upside down works great).
Achieving the Perfect Texture
- Hydration is Key: The exact water needed depends on how moist your sprouts are after draining. Start with less water and add only if necessary. The dough should be tacky but not sloppy.
- Don’t Over-Knead: Brief kneading (2-3 mins) is enough. Over-kneading makes it tough.
- Proof Fully (But Not Too Much!): The finger poke test is your best friend. Proper proofing ensures good rise and texture. An under proofed loaf will be dense; an over-proofed one might collapse.
- Cool Completely: Seriously, wait! This allows the internal structure to set. Warm bread tears easily.
Storing Your Homemade Ezekiel Bread
- Room Temp (Short Term): Once completely cool, store it wrapped in a bread bag or beeswrap at room temperature for 2-3 days.
- Refrigerator: For longer storage (up to 1 week), keep it in the fridge tightly wrapped. It will firm up toast slices for best texture!
- Freezer (Best Option): Slice the cooled loaf. Place slices in a single layer on a baking sheet to freeze solid, then transfer to a freezer bag. Remove slices as needed and toast straight from frozen. Keeps well for 2-3 months.
Ezekiel Bread Recipe FAQs
Got questions? We’ve got answers about this popular ezekiel bread recipe!
Is this ezekiel bread recipe gluten-free?
No, it is not. Traditional Ezekiel bread contains sprouted wheat and barley, both of which contain gluten. The vital wheat gluten also adds more. This recipe is not suitable for a gluten free diet.
Can I use pre-sprouted flour instead?
You might find “sprouted wheat flour” or blends. While convenient, they often produce a drier, less authentic result compared to grinding fresh sprouts yourself in this ezekiel bread recipe. The texture and moisture are different. For the true Ezekiel experience, sprouting the whole grains and beans is best.
Why didn’t my Ezekiel bread rise much?

A few common reasons:
- Sprouts Too Old/Dry: If sprouts sat too long after sprouting, they lose vitality.
- Under-Proofed: The dough didn’t rise long enough during the first or second rise.
- Cold Environment: Dough needs warmth to rise well. Find a warmer spot!
- Over-Kneaded: Excessive kneading can damage the structure.
- Yeast Confusion: Remember, this recipe relies on natural fermentation from the sprouts, not commercial yeast. The rise is more subtle.
How long does homemade Ezekiel bread last?
Because it lacks preservatives, homemade Ezekiel bread has a shorter shelf life than store-bought. At room temperature, enjoy it within 2-3 days. In the fridge, it lasts about a week but is best toasted. Freezing is the champion for long-term storage (2-3 months).
Ready to Bake Your Own Nutritious Loaf?
See? Baking your own wholesome, delicious Ezekiel bread is totally within reach with this simple ezekiel bread recipe! While it involves sprouting, each step from rinsing grains to pulling that golden brown loaf from the oven is incredibly rewarding. You’re not just making bread; you’re creating a nutrient-dense staple packed with goodness and ancient tradition.
The taste of fresh, homemade sprouted bread, still slightly warm (after cooling!) and toasted with your favorite toppings, is unbeatable. Forget the expensive, frozen slices. You’ve got this!
Gather your sprouted grains and bake your first nourishing loaf today! We’d love to hear how your ezekiel bread recipe adventure goes in the comments below. Happy baking!
Ezekiel Bread Recipe: How To Make It In 7 Simple Steps
0.0 out of 5 stars (based on 0 reviews)